

Haliewww everyone! :D
Today's tutorial is inspired by this photo of Japan's Queen of pop singer,
AYUMI HAMASAKI!
I fell so in love with her long upper and lower eyelashes in the picture above!!
K, like always, here are a few before and after pics of me eyes!
今天的教学吖~ 灵感来自她啦~
是的~就是传说中的AYUMI!
我喜欢她长长的上下睫毛,啊啊,迷死我了!
好啦,跟以往一样,成果图先放在先!
BEFORE

(AFTER)


(这次双眼皮贴太明显了.= ="SASA销售员介绍我买的双眼皮贴..我不爱.. :(
我干妈之前送过我20对从日本带回来的双眼皮贴,超级隐形,那个我爱~希望她这次会买多多回来~ XD )
(The double eyelid tape that I bought this time is SOOOO obvious!!= =" I listened to the salesgirl in SASA, she recommended me to get those from her! Which I hate it ever since the first application! I hope my fairy godmother would bring back more of the double eyelid tape which she once gave me long long time ago from Japan.. THAT WAS GOOD wheyy! ;( )
TIME USEED TO COMPLETE THE LOOK
10 MINUTES
**Really easy look to complete!(if you don't place false eyelashes lah..)**
Today, I shall be using only 2 makeup products.. False eyelashes.. AND.. The "Earth Palette!" No gel/ liquid eyeliner whey! oh a little bit of mascara though.. anyway!
You can check out the Earth and Pixie palette here if you'd like!
今天我使用的是"大地系眼影盒"! 完全没用到任何的眼线笔/液/胶哦! 不过是有用到一点点的睫毛膏啦...
你可以点进来这边看看"大地系眼影盒"跟"精灵系眼影盒"!
Pixie palette Earth palette

As always, I start off my makeup by wearing coloured+ iris enlargement contact lenses.
**OPTIONAL**
跟平常一样,还没开始化妆之前就戴上隐形眼镜(有颜色+放大)
**可以选择不戴**

**OPTIONAL**
跟平常一样,还没开始化妆之前就戴上隐形眼镜(有颜色+放大)
**可以选择不戴**
Next, apply on some eye primer to let your eyeshadow colours last longer later on.
If you don't have eye primer, you can use a bit of concealer as an alternative too! :D
then,place on a pair of double eyelid tape.
**double eyelid tape is optional. I'm very into placing double eyelid tape on my eyelids lately. **
然后在整个眼皮至眉骨涂上一点眼睛的底霜, 你有做这个步骤的话你的眼影可以顶一整天的.
如果你没眼睛底霜的话也没关系~ 你可以使用一点点的遮暇膏来代替 :D
然后,贴上双眼皮贴.
**你可以选择是否要使用双眼皮贴, 我最近是很爱贴啦**
I'm using colour M06 on the earth palatte, and an eyeshadow brush to brush the colour all over the crease till the hollows of the eyes.(M06 is a golden, shimmering colour, if you have anything like this colour, you can use it too!)
现在我使用的是大地系眼影盒上的颜色M06,还有个眼影刷, 把M06从眼睛的折痕上刷至眼窝.
(M06是个有闪粉的金色, 如果你有类似酱的颜色的话,你也可以拿来使用哦)
现在我使用的是大地系眼影盒上的颜色M06,还有个眼影刷, 把M06从眼睛的折痕上刷至眼窝.
(M06是个有闪粉的金色, 如果你有类似酱的颜色的话,你也可以拿来使用哦)


Using a flat brush, dab some M10 on the earth palatte (which is a matte brown colour,if you have anything like this colour, you can use it too!), and brush the colour onto the outer hollows of the eye area.(**note, not the ENTIRE hollow, just half way**) It's just right above your crease!
用个平头刷, 沾点M10, (是个巧克力褐色, 如果你有类似酱的颜色的话,你也可以拿来使用哦), 然后从你的眼窝最外面刷一条横线进去. (**注意,不是整个眼窝,只是一半而已哦**)

At first it WILL look like you've just used eyeshadow to draw a line upon the outer hollows of the eye.
BUT. you'll have to BLENDDDD it in ! (but if you like the effect it looking like a deep coloured line upon the outer hollows of your eyes, you can skip the blending :) )
The reason why I'm blending the colour inwards instead of outwards is because the colour on outside is obviously darker right? and if you blend it inwards, a bit of the colour on the outside will be transferred from the brush to the inner corner of the eyes.
你做好了上个步骤后, 你的眼窝会看起来你刚刚在那边化了一条横线.
所以你就要把那颜色混合起来~ (不过如果你喜欢刚才的那个效果的话你就可以跳过这个步骤啦)
我会用刷子从外面开始把颜色混进去的原因是因为外面的颜色明显的比较深嘛. 然后如果你从外面把颜色混进去的话, 外面的颜色就会一点一点的移进去里面的位置.

Then, Using colour M01 (a soft,matte white colour. *GREAT dupe for M.A.C eyeshadow vanilla!!!*if you have anything like this colour, you can use it too!), highlight your brow bone! (right below your eyebrow area!)
然后用颜色M01 (是个柔透的白色 *如果你有用MAC 眼影VANILLA的话,这个是很好的代替品!!* 如果你有类似酱的颜色的话,你也可以拿来使用哦) 提亮你的眉骨! (在你眉毛下面而已)


**and here is how i pulled off the eyeliner look without using any gel liner/liqud liner/ eyeliner pencil**
Lastly, using an eyeliner brush, (you know those kinda eyeliner brush that you get for free when you buy drugstore brands gel liner??), spray or dab some water onto the brush, dab on some M015 (which is a black coloured eyeshadow with a little bit of shimmer in it.if you have anything like this colour, you can use it too!)
and draw your eyeliner! here's my tutorial and a reference for how to draw a winged/ cat's eye CLICK HERE! :)*OH make sure that the eyeshadow you're using doesn't react to water if you want to use this technique. because some eyeshadow's would be ruined once it touches a tiny drop of water!*
**然后这就是我没用眼线笔/液/胶,但是还是可以化出眼线的方法**
用一只尖头刷/眼线刷(这种刷子如果你有买药局的眼线胶的话,它们大多数都会送你一只免费的刷子,就是那种刷啦), 在刷子上喷/沾一点水, 沾上M015 (是个有一点点闪粉的黑色眼影. 如果你有类似酱的颜色的话,你也可以拿来使用哦) 然后化你的眼线.
可以参考下这里 CLICK HERE! :)
**记得记得一定要确定你用的眼影可以动到水没有. 因为有些眼影一动到一点水就会整个坏掉了!**

Taking the same brush, or anyother eyeshadow brush or eyeshadow sponge tip, dab some M09 ( it's a dark shimmery brown colour. f you have anything like this colour, you can use it too), and draw it onto your waterline. but not all the way onto the water line.. 3/4 quaters of the water line. if you draw it all the way to the front, you'll look kinda fierce whey..unless you're going for the fierce look lah.
So basically the eyeshadow for this look is completed. You CAN just "kiap" your eyelashes, put on some mascara and go out now because it's kind of an everyday look, real easy to wear.
But as a falsies addict, OF COURSE I WILL WEAR FALSE EYELASHES EVERY SINGLE TIME I MAKEUP!! XD so if you wanna know what falsies I used and how I applied them this time, keep on reading.
用同一把刷子,或者另外一把也可以~ 沾点M09, (是个深褐色,带点亮粉.如果你有类似酱的颜色的话,你也可以拿来使用哦) 然后在你的下眼线化上. 不过不是化到眼头前面, 化你下眼线差不多3/4就好.如果你化到眼头的话不是不可以,只是你会看起来有点凶啦.. 除非你就是要走这路线.
基本上, 这妆的眼影已经教完了.
你可以直接夹你的睫毛, 涂些睫毛膏, 然后出门啦~
不过我是个假睫毛爱好者,一化妆就一定要用假睫毛啦! 所以如果你也想粘的话,就往下看吧~

K so now for the eyelashes. This time I'm using 1 pair of upper eyelashes for each eye. These eyelashes are more of the "natural" kind of eyelashes, so I WANT more volume for the look of my eyelashes because it doesn't look that outstanding on it's own.
这次我用2对假睫毛哦, 一只眼睛就用了一对. 这种是比较"自然"的假睫毛. 我要睫毛看起来浓密,却又不失去那种"自然的感觉".

basically, after you've trimmed the eyelashes to the width of your eyes, stack them both together like the picture above.
当你根据你的眼形修剪好了假睫毛后, 把他们两个互叠起来
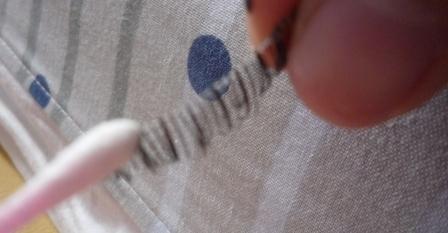
take a cotton bud/ q-tip, squeeze eyelash adhesive upon the q-tip, and smudge the eyelash adhesive upon the stalk? stem? of the false eyelash. **k i dunno what do people call that in english whey.. = =**
拿一只棉花棒, 在上面挤出一些假睫毛胶水,然后在假睫毛的梗上面直接涂上去. (2对当成一对涂)

and this is how my eye looks like after placing the 1 pair of eyelashes upon my eye.
这就是成果.

Now, for the lower lashes, cut one false lower eyelash into half and place it on the outer corner of your waterline.
下睫毛的话, 把一只下睫毛剪成一半. 然后在下眼线眼尾贴上.

remember to take your mascara and brush some on to your front under eyelashes to naturalize your fake lower eyelashes!
然后记得拿你的睫毛膏在你眼头的睫毛上刷上一些睫毛膏让整体看起来更加自然!
AND YOU'RE DONEEEE!!!!!!!!!
:D
就大功告成啦!!!

PS, mm们进来看教学时,如果看到这个按钮或者说看到nuffnang放的广告时,能否帮忙点进去一下?
放心,是没病毒的~ 人格担保啊~! XD
因为每个广告如果点击率够的话,它会给我RM2左右啦.
虽然不多,但是好过没有~
所以拜托MM啦~ 你顺手的一个点击,会让我更有动力做教学~ 爱你们~
PS, hey babes, can you girls and guys help me on this? when you're taking a look at a tutorial,if you see this button or any advertistment by nuffnang, can you help me out and click in to take a look?
relax it's not a virus. I PROMISE!!
because if the click rate is high enough, it'll give me like.. idk, rm 2 for each advetisment?
although it's not much but better than nothing right??
so pleaseee babes, your holy mighty left click would give me more "oommphh" for doing more tutorials!
love you all! mwah!
亲爱的 我想问下
ReplyDelete你用的睫毛是什么牌子什么系列什么MODEL 啊?
我找这种假睫毛 找到我吐血 .... ><
- OREO -