Today's look is inspired by Lena's makeup (mainly her eyes) in her lingerie collection.Kinda fllirty+ burlesque!
Here's a few photos of the end result! :D
这次的妆灵感来自Lena内衣系列的照片 :) 有点甜美, 调逗, 性感的眼妆~
这里先放几张成果照!
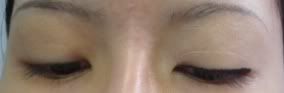
(BEFORE)
之前
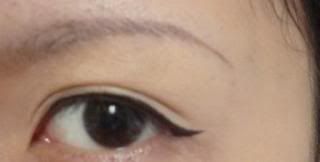
(EYES)
眼睛
(EYES+ FACE LOOK)
眼睛+脸.
P.S, If anyone is interested in the pink puffy laced dress it is available to sell! :D comes in pink, rice colour, and black! @RM 55. International buyers welcome! EMAIL ME at togetherinparis@hotmail.my
P.S, 如果有人对那件蕾丝连身裙有兴趣的话,我有卖喔, 粉红色, 米色,还有黑色! @RM 55.
欢迎国际买家~ 联络方式EMAIL我吧~ togetherinparis@hotmail.my
TIME USEED TO COMPLETE THE LOOK
15 MINUTES
The first step to a good nice looking skin even after you put on foundation,
Is start off with a clean face :D remember to use a moisturizer!
首先, 先把脸洗干净, 然后记得用滋润霜喔!
***Contact Lenses are optional, I ALWAYS wear contact lenses especially those with iris enlargement ones cause you see, I have a small iris and I look damn sleepy without contact lenses.But I'll always recommend wearing contacts lah.***
***隐形眼镜你要带不要带都行.我自己本身一定会配戴隐形眼镜啦. 尤其是瞳孔放大的隐形眼镜. 因为我的瞳孔很小. 没戴的话眼睛会看起来累累的. 不过我每次一定推荐戴隐形眼镜的啦***
As I rarely use foundation, today I'm using Shiseido's White Lucent Makeup Base in Pink as an alternative to foundation. As you can see on the picture on the right hand side, the colour comes out kinda light pinkish!
Any base in this colour will literally lighten your skin tone instantly. I'm using this because in the picture Lena looks really fair and I'm guessing her makeup artist lightened her skin tone too for this photoshoot! you can use your normal foundation or a foundation lighter than your skin tone if you'd like!
由于我很少使用粉底液, 今天我使用的是Shiseido家的White Lucent Makeup Base (底霜), 粉红色, 来代替粉底液. 如果你看看右边的图片的话, 我底霜的颜色有点浅浅的粉红色!
基本上,任何底霜只要是带点浅粉红会让你的皮肤立刻美白掉. 我今天用这个的原因是在照片里Lena看起来很白, 我觉得她的化妆师可能有用比较浅色的粉底在她身上吧~ 你可以使用你平常用的粉底,或者比你肤色再浅一点的粉底~随意你~ :)
Remember to put on some concealer!!
(Concealer tutorial coming soon :D )
记得拍上一些遮暇膏啊!!
(遮暇膏教学即将上菜~ :D )
Prime eyelids with eyeprimer so that your eye makeup can hold for the whole day.
在眼皮至于眉骨 涂上一些眼部底膏,让我眼影在眼皮上更加持久
I'm going to be using double eyelid tape for this look today but it's optional for you if you don't wanna use it if you already have a double eyelid!
(Double eyelid tape tutorial coming soon too!! XD)
今天这妆我会在眼皮上粘双眼皮贴, 不过如果你已经有双眼皮不要粘的话也没有关系啦~
(双眼皮教学也是即将上菜~等嘛等嘛~XD)
**MY CREASE AREA**
**end result**
I'm using a colour like the picture above pat it over the whole eyelid till the crease. This is kinda like a Light Brown colour. Any light brown colour will do! :)
If you're not sure where your crease is, take a brush or your finger, close your eyes and VERY GENTLY poke your eyeball area until you find the tip of your eyeball. Basically it's like a curve or a hollow. And that's your crease.
我是在用着个接近上面图片的颜色, 往眼皮至眼皮折痕处拍上. 我使用的颜色是个浅褐色. 任何浅褐色都能用喔! :)
如果你不清楚你的折痕在哪里, 你可以拿把眼影刷或者用手指, 盖眼睛,往眼珠的部位 轻轻的插, 眼珠的顶端,有点空洞/有点弯, 那就是你的折痕了.
Using a darker shade of brown, TRACE AND LINE the crease area with a brush.
用个比较深的褐色, 用个眼影扫描绘出眼皮折痕的轮廓.
take a rounded eye brush and blend your dark coloured eyeshadow out like the picture above just use the brush and do circular motions from the harsh line till outwards拿把圆形的眼影刷, 开始从深色眼影的地方往外画圈圈,如以上的图片一样~
**end result**
**成果**
Using a highlight colour, I'm using M.A.C's eyeshadow in Vanilla,which is a sheer white, highlight your browbone.
your browbone area should be around the place that I've highlighted in picture 1.
用个打亮眉骨的颜色, 我用的是M.A.C眼影, Vanilla, 是个浅浅的白, 打亮你的眉骨.
你的眉骨的地方大约会是在我在图片一筐/圈起来的地方.
Using a eyeliner pencil, line your upper eye line.go in front of your eye duct, the "<" shape, gently line it too.
用支眼线笔,化条上眼线. 然后在眼睛前面那个"<"形状,轻轻的化过
Basically it would look like this.
基本上应该会看到像酱.
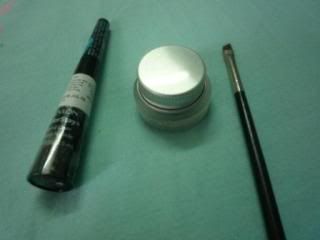
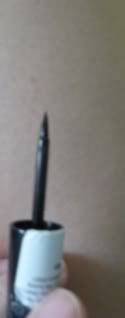
Draw a winged eye using a liquid liner or a gel liner, this time, draw the end of the wing a little bit longer,
kinda as long as the end of your eyebrow?
Here's a tutorial of how to draw a winged eye. Click here >> How to Do a Winged eye
用只眼线液或者眼线膏化个猫眼. 这次把尾巴化长一点. 差不多眉尾有几长你就化到几长?
这里有猫眼教学. 点这里>>
猫眼教学
Using your deepest shade of brown eyeshadow, almost close to black, line your liquid line below not in a straight "--" shape, but rather a more curvy shape
用你手上所拥有的最深的褐色, 在下眼线那边扫上眼影, 别扫成"--" 一直线状,扫湾点, 或者垂点没关系.
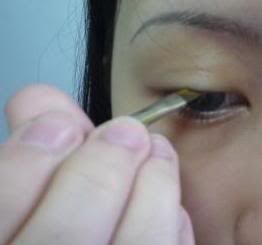
Take a pair of false lower part of the eye eyelashes, pick one out, and cut it into half
拿一对假睫毛, 挑其中一只出来,剪成一半.
The trick to putting on false lower eyelashes, and look natural on you, is how you glue it on your water line.
First, you must have an eyelash glue that YOU personally feel that could make your fake eyelash stay on for hours. I'm using DUO eyelash adhesive. Who wants to party half way when this cute guy walks up to you and say..."erm.. miss..half of your eyelash is on your nose tip..." awkward whey! Then, squeeze a little bit of the glue onto a cotton bud THEN only spread it on the fake eyelash. You won't want to have over execessive eyelash adhesive on your lash line.. trust me... I've been there. XD
Lastly, place the falsies on the part where you've put on the darker shade of eyeshadow just now.
NOT DIRECTLY ON THE WATER LINE, more to the lashline, the falsies actually kinda touches your skin.
在戴下睫毛的时候, 你要容易戴,又要看到自然的话,要靠你怎样粘在下眼线上喔. 在这里教教大家几招自己时常用的. 首先,你需要有一只你自己认为粘力好, 能顶一整天的假睫毛gum,我本身是用住DUO的EYELASH ADHESIVE. 拿你的gum, 挤点在一支棉花棒上, 然后才涂在假睫毛上.
酱做你就不会涂太多在假睫毛上了. 太多gum在假睫毛上会导致假睫毛容易坏,还有眼睛也会不舒服.
最后,把假睫毛帖在你刚才用最深的褐色扫过的地方. 不是直接粘在下眼线上, 而是下眼线外面一点,有 动到皮肤的.
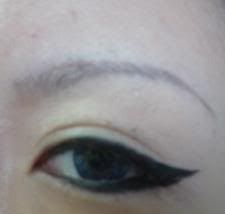
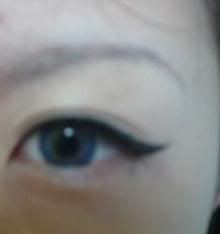
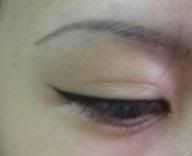
This is how my eye looks like after I've successfully placed the falsies.
这是成功贴了上下假睫毛后的照片
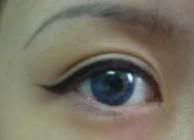
We're not finished yet!!
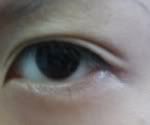
To make the false under eyelash look natural, take your mascara, and paint on some mascara on the front part of your eyelash as I've circled on the BEFORE picture. Then you'll get the effect of the AFTER picture.
还没有完喔~ 要让假的下眼睫毛看起来自然的话, 拿你的mascara, 往你眼头前面的睫毛刷. 我在BEFORE图片有圈起来你要刷哪里. xD
然后,你就会有AFTER的效果了~
AND YOU'RE DONEEEE!! GO "BZZZZZ" SOME GUYS AND MAKE ME PROUDDD!! :D
酱就大工告成啦~~!! 去电些男人, 让我骄傲吧~~!! :D


